Shower Channel Drain: Perfect Installation Guide
A shower channel drain is a sleek and practical solution for modern bathrooms. It offers excellent water drainage while adding a stylish touch. This guide will walk you through everything you need to install it like a pro!
🛠 Tools & Materials You’ll Need
-
Shower channel drain kit (includes the drain body, grate, and connection parts)
-
Measuring tape
-
Pencil or marker
-
Spirit level
-
Mortar or tile adhesive
-
Waterproof membrane
-
Sealant (silicone or waterproof type)
-
Trowel and bucket
-
Pipe connector and plumbing fittings
-
Utility knife or scissors (for cutting membrane)
-
Wrench or pliers
-
Tile cutter (if needed)
📋 Step-by-Step InstallationStep 1: Measure & Plan
Start by measuring your shower floor to determine the correct placement of the channel drain. Mark the outline on the floor using a pencil or marker. Make sure the floor slopes slightly (1-2%) towards where the drain will be placed.
Step 2: Prepare the Floor
If it’s a new installation, prepare the subfloor by ensuring it’s clean, dry, and level. For renovations, remove old flooring or tiles carefully around the marked area.
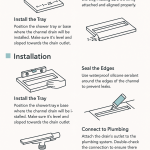
Step 3: Install the Waterproof Membrane
Cut the waterproof membrane to fit the shower floor. Lay the membrane down, ensuring it extends a few inches up the wall edges. Use a sealant to secure it around the drain opening to prevent leaks.
Step 4: Position the Shower Channel Drain
Place the drain channel body into the prepared area. Use a spirit level to ensure it sits evenly and aligns with the slope of the floor. Connect the drain body to the plumbing system using the correct pipe fittings. Double-check the connection for leaks before continuing.
Step 5: Secure & Seal
Mix mortar or tile adhesive and apply it around the drain channel base to secure it in place. Apply waterproof sealant around the edges where the drain meets the floor and wall to create a watertight seal.
Step 6: Tile Around the Drain
Once the drain is securely installed and the adhesive is dry, tile the surrounding floor area. Cut tiles as needed to fit neatly around the drain. Allow adhesive and grout to dry completely.
Step 7: Install the Grate
Place the stainless steel grate or cover into the drain channel. Check that it sits flush with the surrounding tiles.
Step 8: Final Test
Pour water over the shower area to test the drainage. Make sure water flows smoothly into the drain without pooling.
🔍 Pro Tips
✅ Always check the manufacturer’s instructions included with your drain kit.✅ Test-fit everything before securing parts with adhesive or sealant.✅ Consider using a prefabricated shower tray with a built-in slope to simplify the process.
By following these steps, you’ll achieve a smooth, efficient, and stylish shower installation. For high-quality shower channel drains, trust Hasen, a leading manufacturer with a complete supply chain system, dedicated to designing, producing, and exporting premium stainless steel kitchen and bathroom products. Choose Hasen for professional-grade performance and reliable solutions.